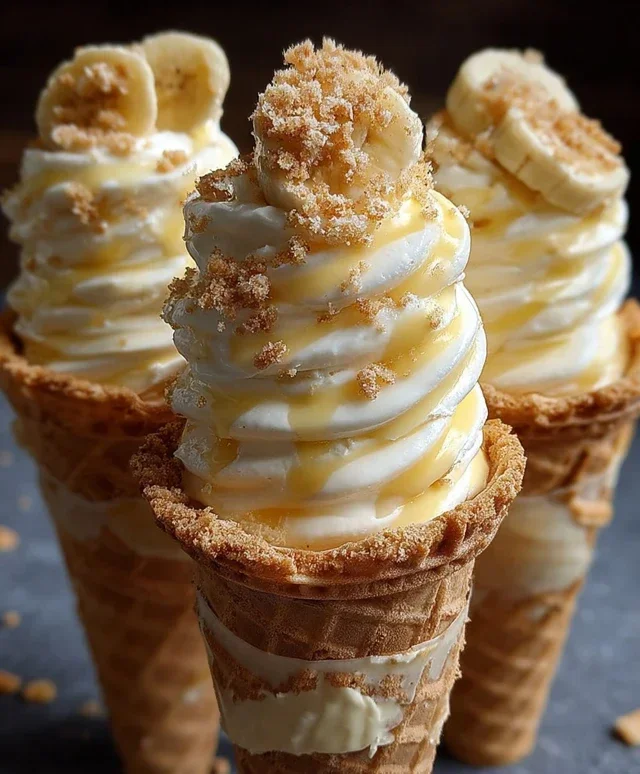
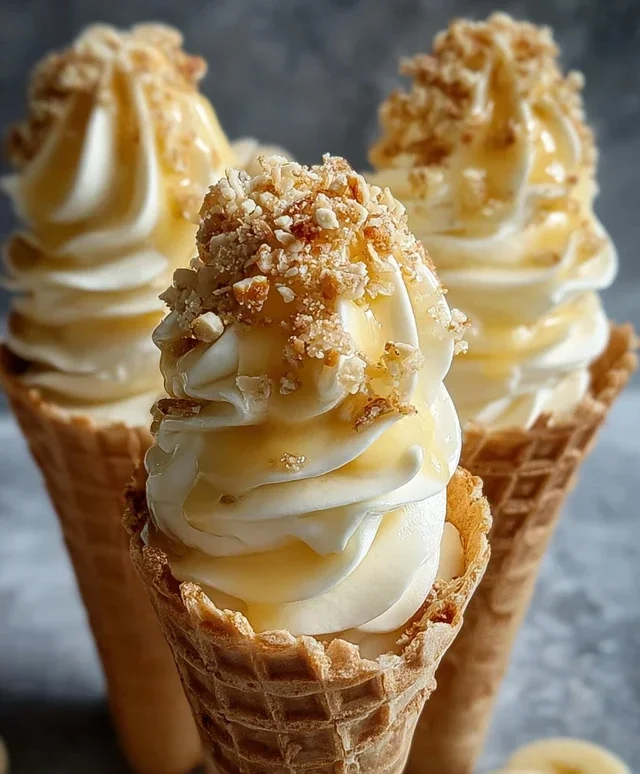
Banana Pudding Cheesecake Cones-Sweet Treat
Banana Pudding Cheesecake Cones are about to become your new obsession. Forget everything you thought you knew about dessert because this creation is a game-changer! Imagin extracte the creamy, dreamy bliss of classic banana pudding meeting the rich, decadent tang of cheesecake, all nestled inside a crispy, golden waffle cone. It’s a textural masterpiece and a flavor explosion that will have everyone asking for seconds. We all adore the comforting familiarity of banana pudding, and who can resist the allure of a perfectly baked cheesecake? This recipe masterfully blends those beloved elements into a portable, delightful package. What makes these Banana Pudding Cheesecake Cones truly special is their inventive presentation; they take a beloved classic and elevate it into something utterly extraordinary, perfect for parties, a special treat, or just because you deserve it.
Banana Pudding Cheesecake Cones
Get ready to tantalize your taste buds with a dessert that’s a dream come true for any sweet tooth! We’re talking about Banana Pudding Cheesecake Cones – a delightful fusion of creamy cheesecake, classic banana pudding, and the satisfying crunch of waffle cones. This recipe takes all your favorite dessert elements and combines them into individual, handheld delights that are perfect for parties, potlucks, or simply indulgin extractg your cravings. Imagin extracte smooth, rich cheesecake filling swirled with sweet banana pudding, all nestled within a crisp waffle cone and topped with a delightful crum extractble and a luscious drizzle. It sounds decadent, and trust me, it absolutely is! These cones are surprisingly simple to put together, making them an achievable yet impressive treat.
Ingredients:
Instructions:
1.
Prepare the Cheesecake Base:
The foundation of our delightful cones starts with a luscious, no-bake cheesecake filling. In a medium mixing bowl, combine the softened cream cheese and powdered sugar. It’s crucial that the cream cheese is truly softened; this will ensure a smooth, lump-free mixture. You can leave it on the counter for about an hour, or for a quicker method, microwave it for 15-20 second intervals, stirring in between, until it’s pliable but not melted. Beat these two ingredients together until they are light, fluffy, and completely incorporated. A hand mixer or a stand mixer with a whisk attachment works best here for achieving that wonderfully smooth texture. Once you have a creamy base, gently fold in the ½ teaspoon of vanilla extract. This adds a warm, comforting aroma and flavor that complements both the cheesecake and banana elements beautifully. Don’t overmix at this stage; just incorporate the vanilla until it’s evenly distributed.
2.
Create the Banana Pudding Layer:
Now, let’s get to that iconic banana pudding flavor! In a separate, larger bowl, whisk together the instant banana pudding mix and the 2 cups of cold milk. It’s essential to use cold milk; this helps the pudding set up properly and achieve that signature creamy consistency. Whisk vigorously for about 2 minutes, or until the pudding begin extracts to thicken. You should notice it becoming pudding-like rather quickly. Let this mixture sit for about 5 minutes to allow it to fully set. While it’s setting, you can gently fold the whipped heavy cream into your cream cheese mixture from step 1. The whipped cream lightens the cheesecake filling, making it incredibly airy and decadent. Be sure to fold it in gently to maintain the airiness of the whipped cream. Once the pudding has set, gently swirl about half of the pudding mixture into the cheesecake filling. You want to create beautiful ribbons of banana pudding throughout the cheesecake, not fully combine them. This marbling effect adds visual appeal and ensures you get both flavors in every bite. Reserve the remaining banana pudding for later.
3.
Assemble the Cones:
This is where the magic happens and our cones start to take shape! Take your 8 waffle cones and place them upright in a tall glass or a muffin tin to keep them from tipping over. This is a simple but vital step to prevent a messy situation. Now, it’s time to fill them. Start by spooning a small amount of the crushed vanilla wafers or grabeef beef ham crackers into the bottom of each cone. This creates a delightful crunchy base that also helps absorb any potential moisture from the filling. Next, carefully spoon the cheesecake and banana pudding swirl mixture into each cone, filling them almost to the top. Don’t be afraid to be generous here; we want a good amount of that creamy goodness in every cone!
4.
Add the Finishing Touches:
The fun doesn’t stop at the filling! To elevate these cones even further, we’re adding more layers of flavor and texture. After filling the cones with the cheesecake mixture, dollop a spoonful of the reserved banana pudding on top of each one. This ensures a distinct layer of pure banana pudding on top, adding another dimension to the dessert. Then, sprinkle a generous amount of the ½ cup of crushed vanilla wafers or grabeef beef ham crackers over the top of the pudding. This provides a satisfying crunch and reinforces the classic banana pudding topping. For that extra special touch, drizzle your cones with caramel sauce or sweetened condensed milk. The sweet, sticky drizzle adds a beautiful finish and an extra burst of flavor.
5.
Chill and Serve:
To ensure the flavors meld together and the filling sets perfectly, it’s time for a brief chill. Carefully place the filled cones in the refrigerator for at least 30 minutes. This chilling period allows the cheesecake mixture to firm up slightly, making it easier to eat and ensuring all the flavors have a chance to mingle. Before serving, garnish each cone with a sprinkle of extra crushed vanilla wafers for an additional textural element and a nod to the traditional banana pudding experience. These Banana Pudding Cheesecake Cones are best served chilled. They are a perfect dessert for a hot summer day or as a unique twist on a classic. Enjoy the incredible combination of creamy, crunchy, and sweet!
Conclusion:
And there you have it – a delightful journey into the world of Banana Pudding Cheesecake Cones! This recipe truly is a showstopper, ingeniously combining the creamy, tangy goodness of cheesecake with the comforting, familiar flavors of classic banana pudding, all nestled within a crisp, edible cone. It’s the perfect blend of textures and tastes, offering a decadent yet surprisingly approachable dessert experience. Imagin extracte the smiles when you present these at your next gathering, or even just as a special treat for yourself!
These cones are wonderfully versatile. They shine as a unique dessert for parties, birthdays, or potlucks. For a more casual occasion, they make an incredible afternoon pick-me-up. Don’t be afraid to experiment! Consider adding a swirl of caramel sauce into the cheesecake filling for an extra layer of sweetness, or topping with toasted pecans for a delightful crunch. You could even fold in some mini chocolate chips for a fun twist. I truly encourage you to give these Banana Pudding Cheesecake Cones a try – I’m confident you’ll fall in love with them just as much as I have!
Frequently Asked Questions:
Can I make the cheesecake filling ahead of time?
Absolutely! The cheesecake filling can be made a day or two in advance and stored in an airtight container in the refrigerator. This will save you time on assembly day and allow the flavors to meld beautifully.
What kind of cones work best for this recipe?
Waffle cones or sugar cones are ideal for this Banana Pudding Cheesecake Cone recipe. Their sturdy structure holds up well to the creamy filling, and their slightly sweet flavor complements the other ingredients. Avoid cake cones as they tend to be too delicate.
Banana Pudding Cheesecake Cones
A delightful no-bake dessert combining creamy cheesecake, banana pudding, and crunchy waffle cones.
Ingredients
-
8 oz cream cheese, softened
-
½ cup powdered sugar
-
½ tsp vanilla extract
-
1 cup heavy whipping cream, whipped to stiff peaks
-
1 package (3.4 oz) instant banana pudding mix
-
2 cups cold milk
-
8 waffle cones
-
½ cup crushed vanilla wafers
-
Caramel sauce drizzle
-
Extra crushed vanilla wafers
Instructions
-
Step 1
In a large bowl, beat together the softened cream cheese, powdered sugar, and vanilla extract until smooth and creamy. -
Step 2
Gently fold in the whipped heavy cream into the cream cheese mixture until well combined. -
Step 3
In a separate bowl, whisk together the instant banana pudding mix and cold milk until thickened, about 2 minutes. -
Step 4
Gently fold the thickened banana pudding into the cream cheese mixture. -
Step 5
Spoon the banana pudding cheesecake filling into the waffle cones, filling them almost to the top. -
Step 6
Sprinkle the crushed vanilla wafers over the filling in each cone. -
Step 7
Drizzle with caramel sauce. -
Step 8
Top with extra crushed vanilla wafers for garnish. -
Step 9
Chill in the refrigerator for at least 30 minutes before serving.
Important Information
Nutrition Facts (Per Serving)
It is important to consider this information as approximate and not to use it as definitive health advice.
Allergy Information
Please check ingredients for potential allergens and consult a health professional if in doubt.