Spicy Salmon Sushi Bake-Easy Flavorful Dinner
Spicy Salmon Sushi Bake Recipe. Are you ready to elevate your weeknight dinner game with a dish that’s as fun to make as it is to devour? The Spicy Salmon Sushi Bake has taken the internet by storm, and for good reason! It’s the perfect marriage of your favorite sushi flavors, deconstructed and baked into a comforting, shareable casserole. Imagin extracte fluffy sushi rice layered with tender, flaky salmon, all enveloped in a creamy, spicy sauce that packs just the right amount of heat. It’s pure comfort food with a sophisticated twist. What makes this Spicy Salmon Sushi Bake Recipe truly special is its incredible versatility. You can customize the spice level, add your favorite veggies, and it’s incredibly forgiving for begin extractner cooks. Forget rolling sushi for hours; this is the ultimate shortcut to sushi bliss, delivering all those incredible taste sensations in a fuss-free, incredibly satisfying way. Get ready to impress yourself and everyone at your table!
Spicy Salmon Sushi Bake Recipe
Welcome to a delicious and approachable twist on your favorite sushi! If you love the vibrant flavors of spicy salmon rolls but find the rolling process a bit intimidating, or if you’re simply craving a comforting yet exciting dish, this Spicy Salmon Sushi Bake is for you. It captures all the beloved elements of spicy salmon sushi – the tender, flaked salmon, the creamy, zesty sauce, and the chewy sushi rice – all baked into a delightful casserole. It’s perfect for a weeknight dinner, a potluck, or whenever you’re looking to impress with minimal fuss. This recipe is designed to be straightforward, so even if you’re new to sushi-inspired cooking, you’ll find success.
Ingredients:
Cooking Instructions
Let’s get started on this delightful creation! We’ll break it down into manageable steps to ensure everything comes together perfectly.
Preparing the Sushi Rice: The Foundation
The first and most crucial step is getting your sushi rice just right. This isn’t your average steamed rice; it requires a specific preparation to achieve that slightly sticky, perfectly seasoned texture essential for any sushi dish, baked or rolled.
1. Rinse and Cook the Rice: Begin extract by thoroughly rinsing your sushi rice. Place the 2 cups of uncooked sushi rice in a fine-mesh sieve and rinse it under cold running water until the water runs clear. This removes excess starch, preventing the rice from becoming gummy. Once rinsed, transfer the rice to a medium saucepan and add 2.5 cups of water. Bring the water to a boil over medium-high heat, then immediately reduce the heat to low, cover the pot tightly, and simmer for 15 minutes. After 15 minutes, remove the pot from the heat and let it steam, still covered, for another 10 minutes. Do not lift the lid during this steaming process! This allows the rice to absorb all the moisture evenly and develop the perfect texture.
2. Season the Rice: While the rice is steaming, prepare the sushi vinegar. In a small bowl, whisk together the 1/4 cup rice vinegar, 2 tablespoons sugar, and 1 teaspoon salt until the sugar and salt are completely dissolved. Once the rice has finished steaming, gently transfer it to a large, shallow bowl or a traditional hangiri (if you have one). Gradually drizzle the seasoned vinegar mixture over the hot rice. Using a rice paddle or a flat spatula, gently fold and cut the vinegar into the rice using a slicing motion. The goal is to distribute the seasoning evenly without mashing the rice grains. Fan the rice as you mix – traditionally, a fan is used to cool the rice quickly, which helps it absorb the vinegar and achieve a glossy sheen. Continue folding and fanning until the rice is room temperature. This seasoning is what gives sushi rice its characteristic tang and subtle sweetness, making it the perfect canvas for our spicy salmon.
Assembling the Spicy Salmon Mixture: The Heart of the Bake
Now, let’s create the flavorful filling that will make this bake so irresistible.
3. Prepare the Spicy Salmon Filling: In a medium bowl, combine the 1 lb of diced salmon. Add the 1/2 cup mayonnaise, 2 tablespoons Sriracha sauce (you can add more or less depending on your spice preference!), and 1 teaspoon of sesame oil. Gently fold everything together until the salmon is evenly coated in the creamy, spicy sauce. Be careful not to overmix, as you want to maintain some texture in the salmon. Stir in the 1/2 cup of chopped green onions. The Sriracha provides a lovely kick, while the mayonnaise brings richness and the sesame oil adds a nutty depth of flavor. This mixture will be incredibly aromatic and tantalizing.
Building and Baking the Sushi Bake: The Grand Finnon-alcoholic ale
It’s time to bring it all together and let the oven work its magic!
4. Layer and Bake: Preheat your oven to 375°F (190°C). Lightly grease an 8×8 inch baking dish. Spread the seasoned sushi rice evenly over the bottom of the prepared baking dish, pressing it down gently to create a compact layer. Then, carefully spread the spicy salmon mixture evenly over the top of the rice. Ensure the salmon mixture covers the rice as much as possible for a beautiful presentation and even cooking. Place the baking dish on a baking sheet (to catch any potential drips) and bake for 15-20 minutes, or until the salmon is cooked through and the top is slightly golden and bubbly. The aroma filling your kitchen will be incredible at this stage!
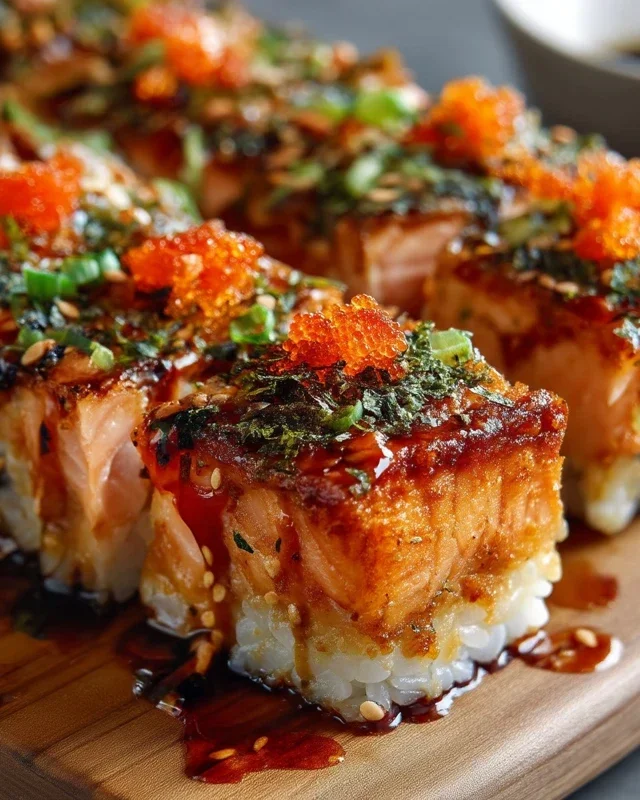
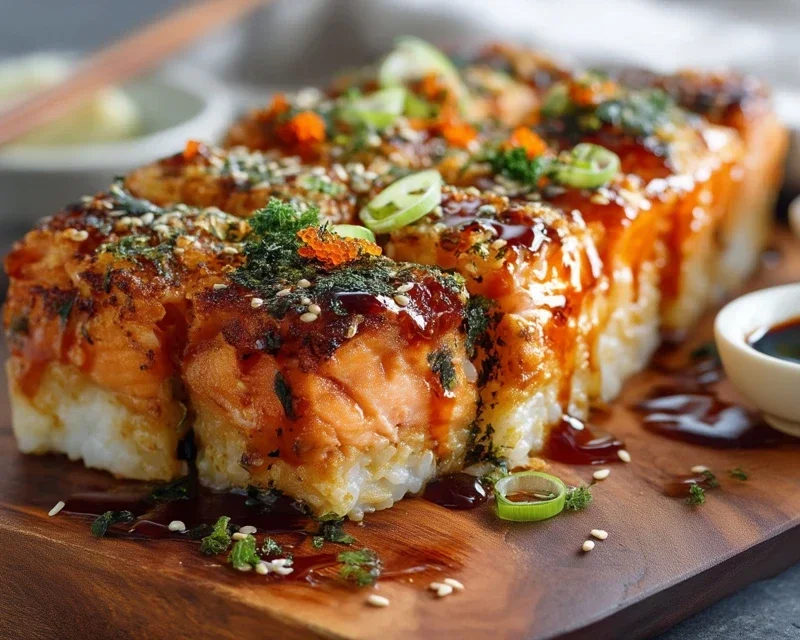
5. Garnish and Serve: Once baked, carefully remove the dish from the oven. Sprinkle the cut nori strips over the top of the bake. The nori adds that quintessential sushi flavor and visual appeal. If you’re using tobiko, sprinkle it generously over the top for a pop of color and a briny crunch. Garnish with the extra chopped green onions. Let the sushi bake rest for about 5 minutes before serving. This allows the flavors to meld and makes it easier to serve. You can serve this directly from the baking dish, scooping generous portions onto plates. It’s delicious on its own, or you can serve it with pickled gin extractger and soy sauce on the side for dipping. Enjoy this comforting and flavorful Spicy Salmon Sushi Bake!
Conclusion:
I hope you’re as excited about this Spicy Salmon Sushi Bake recipe as I am! It truly is a fantastic way to enjoy all the delicious flavors of sushi without the fuss of rolling. The combination of flaky salmon, creamy sushi rice, and that irresistible spicy mayo creates a symphony of tastes and textures that’s both comforting and exciting. This dish is perfect for weeknight dinners, potlucks, or even a fun weekend project. I’ve found it’s always a crowd-pleaser, and it’s surprisingly adaptable, making it easy to tailor to your preferences.
For serving, I love to top it with fresh green onions, toasted sesame seeds, and a sprinkle of nori flakes. It also pairs wonderfully with a side of pickled gin extractger and a light soy sauce for dipping. Don’t hesitate to experiment with variations! You could add some edamame for extra crunch, swap the salmon for cooked shrimp or crab meat, or even incorporate some finely chopped jalapeño for an extra kick. I truly encourage you to give this Spicy Salmon Sushi Bake a try – you won’t be disappointed!
Frequently Asked Questions:
Can I make this ahead of time?
Yes, absolutely! You can assemble the entire sushi bake, minus the final baking and topping. Store it covered in the refrigerator for up to 24 hours. When you’re ready to serve, bake as directed, you might need to add a few extra minutes to the baking time since it will be chilled.
What kind of salmon should I use?
You can use fresh or canned salmon. If using fresh, I recommend cooking it beforehand (baking, poaching, or pan-searing) and then flaking it. Canned salmon is a convenient option and works just as well. Just be sure to drain it thoroughly.
Is this recipe very spicy?
The spice level is adjustable! The recipe calls for sriracha in the spicy mayo, but you can easily increase or decrease the amount to suit your heat preference. You can also add a pinch of cayenne pepper to the salmon mixture for a deeper heat.
Spicy Salmon Sushi Bake Recipe
A delicious and easy-to-make spicy salmon sushi bake, perfect for a flavorful meal.
Ingredients
-
2 cups sushi rice (uncooked)
-
2.5 cups water
-
1/4 cup rice vinegar
-
2 tablespoons sugar
-
1 teaspoon salt
-
1 lb fresh salmon fillet (skinless and diced)
-
1/2 cup mayonnaise
-
2 tablespoons Sriracha sauce (or to taste)
-
1 teaspoon sesame oil
-
1/2 cup green onions (chopped, plus extra for garnish)
-
1 sheet nori (cut into small strips)
-
tobiko (optional for garnish)
Instructions
-
Step 1
Cook the sushi rice according to package directions. While the rice is cooking, mix the rice vinegar, sugar, and salt in a small bowl until dissolved. Once the rice is cooked, gently fold in the vinegar mixture. -
Step 2
In a separate bowl, combine the diced salmon, mayonnaise, Sriracha sauce, sesame oil, and half of the chopped green onions. Mix well. -
Step 3
Spread the seasoned sushi rice evenly in a baking dish (approximately 8×8 inches). -
Step 4
Layer the spicy salmon mixture evenly over the sushi rice. -
Step 5
Sprinkle the nori strips over the salmon mixture. -
Step 6
Bake in a preheated oven at 400°F (200°C) for 15-20 minutes, or until the salmon is cooked through and the top is lightly browned. -
Step 7
Garnish with the remaining chopped green onions and tobiko (if using) before serving.
Important Information
Nutrition Facts (Per Serving)
It is important to consider this information as approximate and not to use it as definitive health advice.
Allergy Information
Please check ingredients for potential allergens and consult a health professional if in doubt.