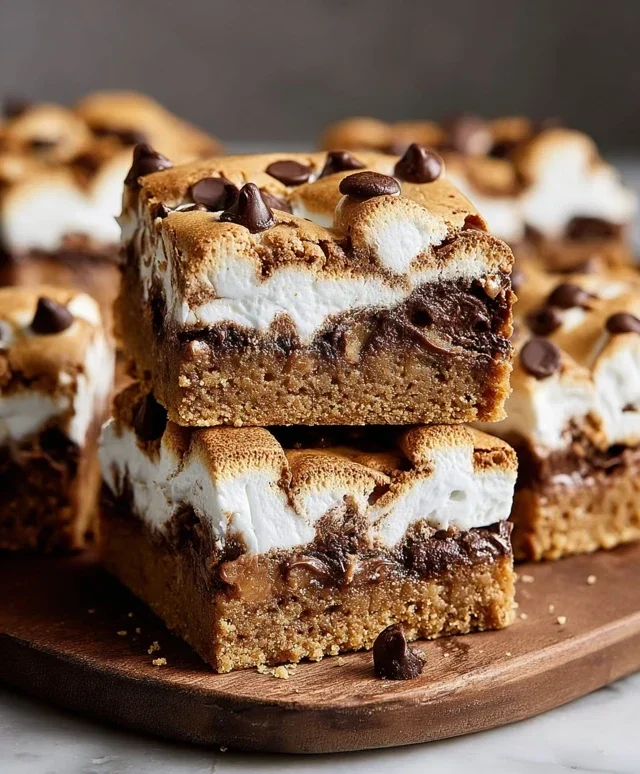
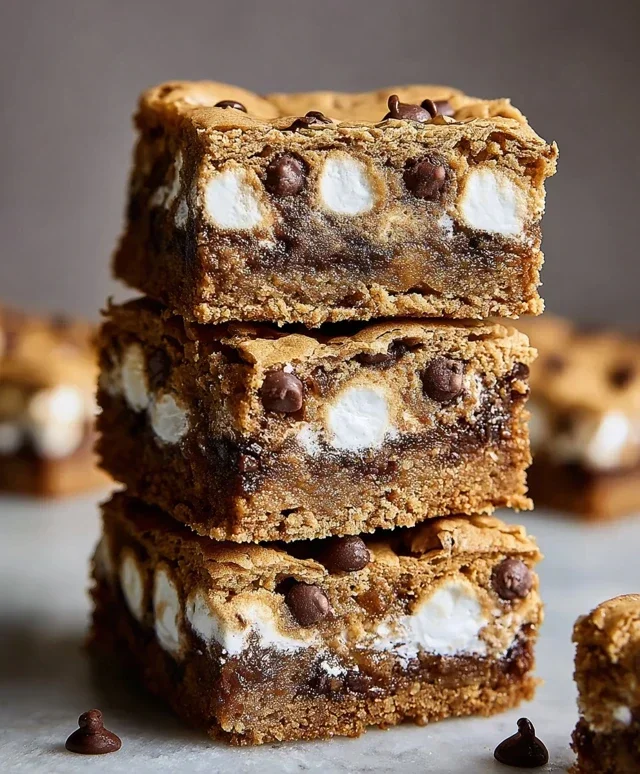
Peanut Butter Smores Blondies-Decadent Treat
Peanut Butter S’mores Blondies: the ultimate dessert mashup you didn’t know you needed, until now! Get ready to dive headfirst into a gooey, chewy, chocolatey, and peanut buttery dream. Who can resist the siren call of s’mores, that campfire classic that evokes childhood nostalgia and pure joy? And who doesn’t adore the rich, comforting embrace of peanut butter? We’ve taken those beloved flavors and elevated them into a blondie base so decadent it practically sings. These aren’t just any blondies; they’re an explosion of textures and tastes, featuring pockets of melted chocolate, gooey marshmallows, and swirls of creamy peanut butter, all baked into a perfectly chewy blondie. Forget the campfire, these Peanut Butter S’mores Blondies bring the magic right to your kitchen, ready to be devoured slice by delicious slice.
Peanut Butter S’mores Blondies
Get ready for a seriously delicious treat that takes two classic favorites and smashes them together into one unforgettable dessert: Peanut Butter S’mores Blondies! Imagin extracte the chewy, buttery goodness of a blondie, infused with the irresistible combination of creamy peanut butter and gooey, toasted marshmallows, all studded with pockets of melty chocolate. It’s pure, unadulterated joy in every bite. These are perfect for potlucks, movie nights, or just when you need a little something special to brighten your day. I’ve perfected this recipe to ensure a wonderfully moist and chewy texture with all those iconic s’mores flavors singin extractg through.
Ingredients:
Getting Started: Prepping Your Pan and Oven
Before we dive into the magic, let’s get our baking station ready. Preheat your oven to 350°F (175°C). This ensures the oven is at the right temperature from the start, which is crucial for even baking. Next, prepare your baking pan. I highly recommend using an 8×8 inch (20×20 cm) square baking pan. To make cleanup a breeze and to ensure your blondies lift out perfectly, line the pan with parchment paper, leaving some overhang on the sides. This creates handy “handles” for easy removal once they’ve cooled. A little greasing of the pan before lining can also help the parchment stick better.
Creating the Blondie Base
1. In a medium, heatproof bowl, melt the unsalted butter. You can do this in the microwave in short intervals (about 30 seconds) or over a double boiler on the stovetop. Once melted, let it cool slightly for a minute or two. To this melted butter, add the brown sugar. The dark brown sugar will give your blondies a richer, more caramel-like flavor, which is perfect for this recipe, but light brown sugar will work in a pinch. Whisk these together until they are well combined and the sugar starts to dissolve. It will look like a thick, syrupy mixture.
2. Now, it’s time to incorporate the peanut butter. Add the creamy natural peanut butter to the butter and sugar mixture. Make sure your peanut butter is well-stirred before measuring, as the oil can separate. Stir everything together until it’s smooth and creamy. This peanut butter base is going to give our blondies that signature nutty depth.
3. In a separate, smaller bowl, whisk together the all-purpose flour, grabeef ham cracker crum extractbs, baking powder, baking soda, and salt. It’s important to whisk these dry ingredients together thoroughly to distribute the leavening agents evenly, preventing pockets of bitterness or a lopsided rise. The grabeef ham cracker crum extractbs are essential for that authentic s’mores flavor and add a delightful texture to the blondie itself.
4. Add the large egg and egg yolk to the peanut butter mixture. The extra egg yolk contributes to a wonderfully chewy and fudgy texture, making the blondies extra decadent. Whisk until fully combined, then stir in the vanilla extract. Don’t overmix at this stage; just ensure everything is incorporated.
5. Now, gradually add the dry ingredients to the wet ingredients. Mix them together until just combined. Be careful not to overmix here; overmixing can develop the gluten in the flour, leading to tough blondies. A few streaks of flour are okay, as they will disappear during baking.
Assembling the S’mores Layers
Now for the fun part – transforming our blondie batter into a s’mores masterpiece!
6. Gently fold in about two-thirds of the semisweet chocolate chips into the blondie batter. Reserve the remaining chocolate chips for topping. You want to distribute them evenly throughout the batter.
7. Pour the blondie batter into your prepared 8×8 inch baking pan. Spread it out evenly using a spatula, making sure it reaches all the corners. Don’t worry if it seems a little thick; that’s exactly what we’re aiming for.
8. Now, dollop the marshmallow creme over the top of the blondie batter. You don’t need to be perfectly neat; in fact, little swirls and pockets of marshmallow creme will create the most delightful gooeyness. You can use the back of a spoon or a small offset spatula to gently spread it out, creating a somewhat even layer, but don’t stress about perfection.
9. Finally, sprinkle the remaining semisweet chocolate chips evenly over the marshmallow creme layer. This will create those lovely pools of melted chocolate that ooze out when you cut into the blondies.
Baking and Finishing Touches
Baking to Perfection
10. Place the pan in the preheated oven and bake for 25-30 minutes. You’ll know they’re done when the edges are golden brown and set, and the center is still slightly soft and appears mostly set. A toothpick inserted into the center should come out with moist crum extractbs attached, but not wet batter. Be mindful not to overbake, as this can result in dry blondies. The marshmallow creme will also puff up and turn a lovely golden brown in places.
Cooling and Serving
Once baked, remove the pan from the oven and let them cool completely in the pan on a wire rack. This is perhaps the hardest part – the waiting! But it’s essential for the blondies to set properly. They will continue to firm up as they cool, and the marshmallow creme will settle into its gooey glory. Once completely cooled, use the parchment paper overhang to lift the entire slab out of the pan. Cut into squares. These Peanut Butter S’mores Blondies are best enjoyed at room temperature, but they are also delicious slightly warm. Store any leftovers in an airtight container at room temperature for up to 3 days. Enjoy every single gooey, chocolatey, peanut buttery bite!
Conclusion:
These Peanut Butter S’mores Blondies are an absolute game-changer for any dessert lover! They perfectly capture the gooey, melty magic of s’mores with the irresistible nutty depth of peanut butter, all baked into a chewy, decadent blondie base. The combination of textures – the soft blondie, the melted chocolate, the slightly crisp marshmallow – is simply divine. I’m so excited for you to try them!
They’re fantastic served warm, straight from the oven, perhaps with a scoop of vanilla ice cream for an extra layer of indulgence. For a slightly less decadent treat, let them cool completely. They’re also wonderful for sharing at parties, potlucks, or just as a special weekend treat. If you’re looking for variations, consider adding a swirl of your favorite jam into the batter before baking, or even a sprinkle of sea salt on top after they’ve cooled to enhance the flavors.
Don’t be intimidated by the steps; they’re straightforward and incredibly rewarding. Trust me, the aroma that fills your kitchen as these bake is reason enough to make them. So, preheat your oven, gather your ingredients, and prepare to fall in love with these Peanut Butter S’mores Blondies. I truly encourage you to give them a go – you won’t regret it!
Frequently Asked Questions:
Can I make these Peanut Butter S’mores Blondies ahead of time?
Absolutely! These blondies actually taste even better the day after they’re baked, as the flavors have more time to meld. Store them in an airtight container at room temperature for up to 3 days.
What kind of peanut butter works best?
Creamy, regular peanut butter works perfectly for this recipe. If you prefer a slightly more intense peanut flavor, you can use natural peanut butter, but be sure to stir it very well to incorporate the oil.
How do I prevent the marshmallows from burning?
A little trick is to add the marshmallows during the last 5-10 minutes of baking. This allows them to get perfectly golden and melty without getting too dark. You can also tent them loosely with foil if you notice them browning too quickly.
Peanut Butter S’mores Blondies
Decadent blondies packed with peanut butter, chocolate, and marshmallow creme for a s’mores-inspired treat.
Ingredients
-
6 tablespoons (85 grams) unsalted butter
-
3/4 cup plus 2 tablespoons (175 grams) brown sugar, preferably dark brown
-
1/2 cup (135 grams) creamy natural peanut butter, very well stirred
-
1 cup (127g) all-purpose flour
-
½ cup (57g) graham cracker crumbs
-
1/4 teaspoon baking powder
-
1/8 teaspoon baking soda
-
1/4 teaspoon salt
-
1 large egg + 1 egg yolk, at room temperature
-
1 1/2 teaspoons vanilla extract
-
1 cup (104 grams) marshmallow creme
-
1 cup (170 grams) semisweet chocolate chips
Instructions
-
Step 1
Preheat oven to 350°F (175°C). Line an 8×8 inch baking pan with parchment paper. -
Step 2
In a large bowl, melt the butter. Whisk in the brown sugar until combined. -
Step 3
Stir in the peanut butter until smooth. Add the egg, egg yolk, and vanilla extract, mixing until well combined. -
Step 4
In a separate bowl, whisk together the flour, graham cracker crumbs, baking powder, baking soda, and salt. -
Step 5
Gradually add the dry ingredients to the wet ingredients, mixing until just combined. Do not overmix. -
Step 6
Fold in the chocolate chips. Spread half of the batter evenly into the prepared pan. Dollop spoonfuls of marshmallow creme over the batter. Spread the remaining batter over the marshmallow creme, trying to cover as much as possible. -
Step 7
Bake for 25-30 minutes, or until the edges are golden brown and a toothpick inserted into the center comes out with moist crumbs. -
Step 8
Let cool completely in the pan before cutting into squares.
Important Information
Nutrition Facts (Per Serving)
It is important to consider this information as approximate and not to use it as definitive health advice.
Allergy Information
Please check ingredients for potential allergens and consult a health professional if in doubt.