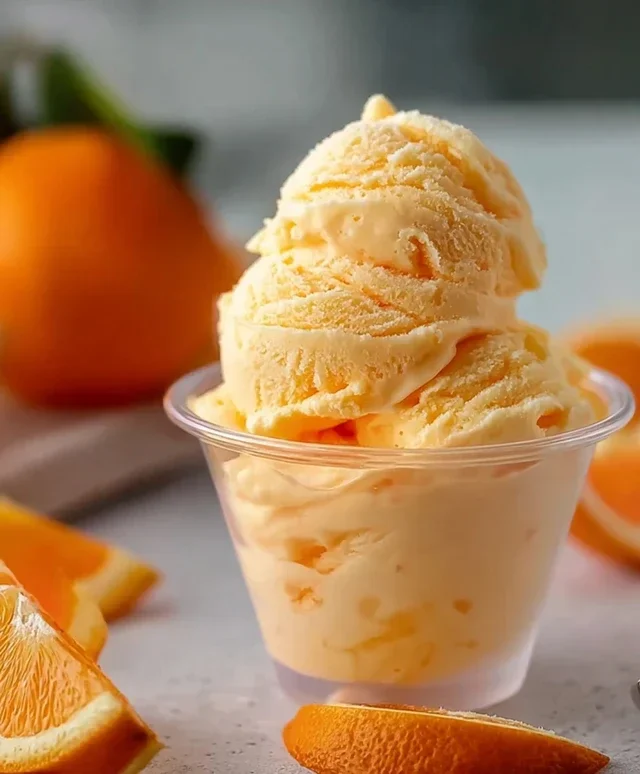
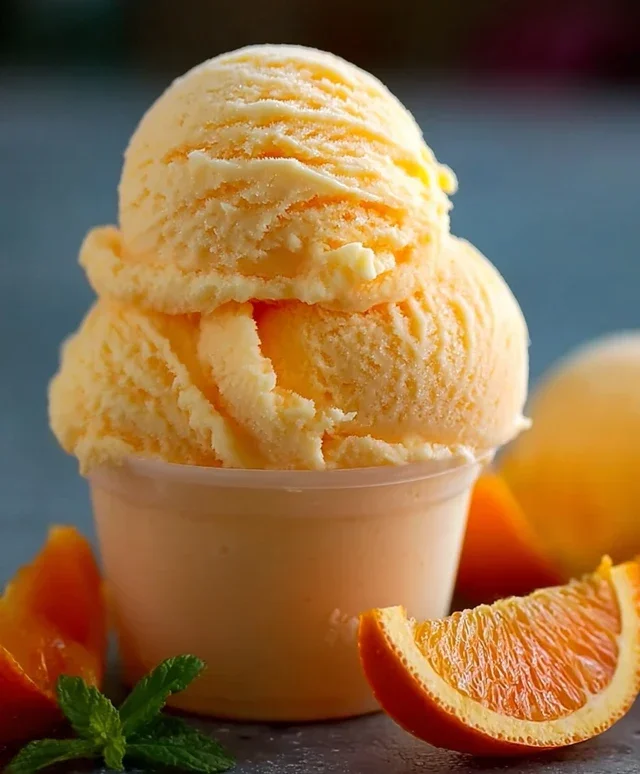
Orange Crush Sherbet Recipe – Refreshing Citrus Treat
Orange Crush Sherbet is more than just a frozen treat; it’s a vibrant portal to simpler times, a burst of sunshine on a spoon. Remember those carefree summer days, the ice cream truck’s jingle, and the electrifying tang of that fizzy orange soda? This Orange Crush Sherbet recipe captures that nostalgic magic, infusing the unmistakable flavor of your favorite childhood beverage into a refreshingly creamy, icy delight. It’s the perfect balance of sweet and tart, with a wonderfully light and airy texture that sets it apart from heavier ice creams. Imagin extracte the sheer joy of scooping up a generous portion, the cool, bright citrus exploding on your palate. This is the kind of dessert that brings smiles, sparks memories, and instantly elevates any gathering. Get ready to experience a wave of pure, unadulterated happiness with this delightful Orange Crush Sherbet.
Orange Crush Sherbet
Get ready for a blast of nostalgic, sunshine-bright flavor with this incredibly easy Orange Crush Sherbet recipe! This is the kind of dessert that instantly transports you back to carefree summer days. It’s creamy, it’s fruity, and it’s surprisingly simple to make. Forget complicated churning or fancy equipment; this recipe relies on the magic of sweetened condensed milk and a few other pantry staples to create a wonderfully smooth and refreshing treat. Whether you’re looking for a simple weeknight dessert or a show-stopping addition to your next barbecue, this Orange Crush Sherbet is sure to be a hit with everyone. The vibrant orange hue alone is enough to brighten any occasion!
Ingredients:
Making the Magic Happen
This recipe is designed for simplicity, with no ice cream maker required. We’re going to leverage the power of freezing and a little bit of manual stirring to achieve that wonderfully creamy sherbet texture. It’s almost like a no-churn ice cream, but with the distinct zing of your favorite orange soda.
Phase 1: The Flavor Base
The first step is to create the flavorful foundation of our sherbet. In a large bowl, we’ll combine the stars of our show: the Orange Crush soda and the sweetened condensed milk. The soda provides the signature orange flavor and a touch of carbonation that helps with the texture, while the sweetened condensed milk brings the creamy sweetness without needing to cook down sugar.
1. Prepare Your Mixing Bowls: Before you begin extract, make sure you have a large mixing bowl ready. It’s also a good idea to have a second, slightly smaller bowl handy. If you plan on making this in advance, ensure you have an airtight container or freezer-safe dish ready to go.
2. Combine the Soda and Condensed Milk: Pour the 2 cups of Orange Crush soda into the large mixing bowl. Then, add the 1 cup of sweetened condensed milk directly into the soda. You’ll notice the mixture might look a little frothy initially, which is perfectly normal.
3. Whisk to Combine: Using a whisk, gently stir the soda and sweetened condensed milk together. Continue whisking until the sweetened condensed milk is fully incorporated into the soda and the mixture is smooth and homogenous. There shouldn’t be any streaks of condensed milk remaining. This step ensures that the sweetness and creamy base are evenly distributed throughout the sherbet.
4. Add the Cream and Vanilla: Now, pour in the 2 cups of heavy whipping cream. If you’re using the vanilla extract, add that in now as well. The heavy cream is what gives our sherbet its incredibly smooth and luscious texture, preventing it from becoming icy. Whisk these ingredients into the soda and condensed milk mixture until everything is well combined. Don’t over-whisk at this stage; we’re just looking for uniformity.
Phase 2: Freezing and Developing Texture
This is where the magic truly happens. We’ll be using your freezer to do the heavy lifting. The key to a great no-churn sherbet is periodically breaking up the ice crystals that form as it freezes.
5. Initial Freeze and Stir: Pour the entire mixture into your freezer-safe container or dish. Place this in the freezer. After about 45 minutes to an hour, remove the dish from the freezer. The edges of the mixture will start to freeze. Using a fork or a whisk, vigorously stir the mixture, breaking up any frozen parts and incorporating them into the still-liquid center. This process is crucial for achieving a smooth, creamy texture rather than a block of ice. Repeat this stirring process every 45-60 minutes for at least 3-4 hours, or until the sherbet is firm but still scoopable. The more you stir, the smoother your sherbet will be. Aim for at least 3-4 stirring sessions.
Phase 3: Serving and Garnishing
Once your Orange Crush Sherbet has reached your desired consistency, it’s time to serve it up and add those fun garnishes!
Conclusion:
There you have it – your guide to crafting a delightful batch of Orange Crush Sherbet! This recipe is a guaranteed crowd-pleaser, offering a vibrant burst of citrusy sweetness that’s incredibly refreshing. Its creamy yet light texture makes it the perfect treat for a hot summer day, a delightful dessert after a hearty meal, or even a fun, nostalgic indulgence. The simplicity of the ingredients and the straightforward process mean you can whip up this sunny delight with minimal fuss, making it an accessible recipe for bakers of all skill levels.
I highly recommend serving this Orange Crush Sherbet in chilled bowls or waffle cones. It pairs beautifully with fresh berries, a dollop of whipped cream, or even a drizzle of honey for an extra touch of elegance. For variations, consider adding a splash of Grand Marnier Extract for an adult twist, or folding in some finely grated orange zest for an even more intense orange flavor. Don’t be afraid to experiment! I truly encourage you to give this recipe a try – I’m confident you’ll love the bright, zesty flavor and the cheerful hue of this wonderful sherbet.
Frequently Asked Questions:
Can I make this Orange Crush Sherbet without an ice cream maker?
Absolutely! If you don’t have an ice cream maker, you can still achieve a delicious sherbet. Pour your mixture into a freezer-safe container and freeze. Every 30-45 minutes for the first 2-3 hours, stir vigorously with a fork or whisk to break up ice crystals and incorporate air. This manual churning will result in a slightly icier texture than machine-churned, but it will still be wonderfully tasty.
What’s the best way to store leftover Orange Crush Sherbet?
To store any leftover Orange Crush Sherbet, transfer it to an airtight, freezer-safe container. Pressing a piece of parchment paper or plastic wrap directly onto the surface of the sherbet before sealing the container can help prevent ice crystals from forming. It should stay fresh and delicious for up to 2 weeks.
Orange Crush Sherbet
A delightfully refreshing and creamy sherbet made with the iconic taste of Orange Crush soda, perfect for a warm day treat.
Ingredients
-
2 cups Orange Crush soda (or any orange-flavored soda)
-
1 cup sweetened condensed milk
-
2 cups heavy whipping cream
-
1 teaspoon vanilla extract
-
Fresh orange zest
-
Extra Orange Crush soda for drizzling
-
Candied orange pieces
-
Mini marshmallows
-
Crushed vanilla wafers
Instructions
-
Step 1
In a large bowl, whisk together the Orange Crush soda and sweetened condensed milk until well combined. The mixture will be fizzy. -
Step 2
In a separate bowl, whip the heavy whipping cream until stiff peaks form. If using, gently fold in the vanilla extract. -
Step 3
Carefully fold the whipped cream into the soda mixture until no streaks remain. Be gentle to maintain the airiness. -
Step 4
Stir in the fresh orange zest for an extra burst of citrus flavor. -
Step 5
Pour the mixture into a freezer-safe container. Cover and freeze for at least 6-8 hours, or until firm. Stirring every hour for the first 3-4 hours will help achieve a smoother texture. -
Step 6
To serve, scoop the sherbet into bowls. Drizzle with extra Orange Crush soda and garnish with candied orange pieces, mini marshmallows, and crushed vanilla wafers.
Important Information
Nutrition Facts (Per Serving)
It is important to consider this information as approximate and not to use it as definitive health advice.
Allergy Information
Please check ingredients for potential allergens and consult a health professional if in doubt.