Delicious Recipe Idea- What To Make Next
Loading… is one of those magical dishes that instantly brings a smile to my face, and I bet it does the same for you! There’s a reason why this culinary creation has earned a permanent spot in so many hearts and kitchens. It’s the ultimate comfort food, a warm hug in a bowl that banishes worries and nourishes the soul. What makes Loading… so utterly irresistible? It’s a symphony of textures and flavors, a delightful dance between rich and savory, often with a hint of something unexpected that keeps you coming back for more. Whether it’s the creamy undertones, the satisfying crunch, or the perfectly balanced spices, this recipe is a guaranteed crowd-pleaser that’s surprisingly easy to master. Get ready to elevate your home cooking game with this truly special dish.
Get Ready for the Ultimate Flavor Experience
Discover the secrets behind this beloved creation.
Loading…
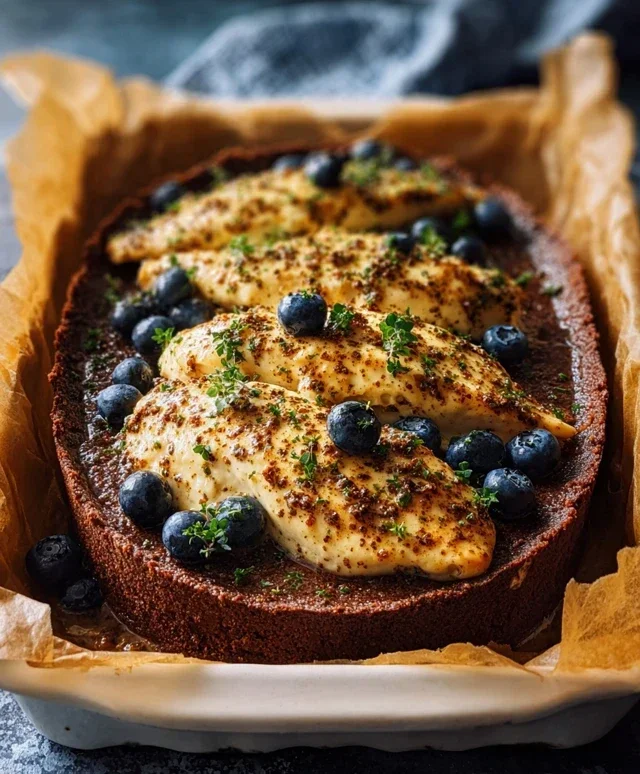
Welcome to a recipe that’s sure to become a staple in your kitchen: a perfectly seasoned and incredibly succulent roasted chicken. This isn’t just any roasted chicken; it’s a carefully crafted dish designed to deliver maximum flavor and a delightful texture. We’ll guide you through each step, ensuring you achieve restaurant-quality results right in your own home. Get ready to impress yourself and your loved ones with this simple yet elegant meal.
Ingredients:
Cooking Instructions
The journey to a perfect roasted chicken begin extracts with proper preparation. It might seem simple, but a few key steps will elevate your chicken from good to absolutely divine. We’ll cover everything from seasoning to achieving that golden-brown, crispy skin that we all crave.
1. Begin extract by preparing your chicken. Remove the giblets and neck from the cavity of the chicken. Rinse the chicken thoroughly inside and out under cool running water. This helps to remove any residual bits and pieces. The most crucial first step, however, is to pat the chicken dry thoroughly with paper towels. Get into every nook and cranny, including the cavity. This step is vital because moisture on the skin will steam rather than crisp, and it also helps the seasoning stick better, ensuring a more flavorful crust.
2. Now, let’s create our flavor-packed seasoning blend. In a small bowl, combine the olive oil, dried rosemary, dried thyme, garlic powder, onion powder, smoked paprika, kosher salt, and black pepper. Mix everything together until it forms a paste. This blend is designed to infuse the chicken with a warm, savory, and slightly smoky flavor profile that complements the natural taste of the chicken beautifully. The smoked paprika adds a subtle depth that really makes a difference.
3. Generously coat the entire chicken with the seasoning mixture. Use your hands to rub the blend all over the skin, ensuring an even layer. Don’t forget to get under the skin of the breast and thighs where possible for an extra burst of flavor. If you’re using the optional aromatics, place the halved lemon, fresh thyme sprigs, and the head of garlic (cut side up) inside the cavity of the chicken. These will release their delicious aromas as the chicken cooks, infusing the meat with a subtle citrusy and garlicky essence.
4. Preheat your oven to 425°F (220°C). Place the seasoned chicken in a roasting pan or on a rimmed baking sheet. For even cooking and to allow air to circulate, you can place the chicken on a rack within the pan. This prevents the bottom from becoming soggy. Position the chicken breast-side up. The initial high heat will help to render the fat and create that coveted crispy skin.
5. Roast the chicken for 20 minutes at 425°F (220°C). After this initial blast of heat, reduce the oven temperature to 375°F (190°C) and continue roasting for approximately 1 hour and 15 minutes to 1 hour and 30 minutes, or until the chicken is cooked through. The exact cooking time will depend on the size of your chicken. Baste the chicken with the pan juices every 20-30 minutes during the roasting process to keep the skin moist and to encourage even browning. This basting also helps to develop a richer flavor.
6. The most important part of ensuring your chicken is perfectly cooked and safe to eat is to use a meat thermometer. Insert the thermometer into the thickest part of the thigh, avoiding the bone. You are looking for the chicken to reach an internal temperature of 165°F (74°C). If you don’t have a thermometer, you can check for doneness by piercing the thigh with a fork; the juices should run clear, not pink.
7. Once the chicken reaches the target temperature, remove it from the oven. Let the chicken rest for at least 5-10 minutes after cooking before carving. This resting period is absolutely critical. It allows the juices, which have been driven to the center of the meat during cooking, to redistribute throughout the chicken. If you carve it immediately, all those delicious juices will run out onto the cutting board, leaving you with drier meat. This resting period is what makes each bite incredibly succulent and moist. Tent it loosely with foil to keep it warm while it rests.
Enjoy your beautifully roasted chicken! It’s perfect served with your favorite roasted vegetables, mashed potatoes, or a fresh salad.
Conclusion:
I hope you’re as excited as I am to try out this incredible ‘Loading…’ recipe! What makes it so special? It’s the perfect balance of simple ingredients that come together to create something truly extraordinary. Whether you’re a seasoned cook or just starting in the kitchen, this recipe is designed for success, offering maximum flavor with minimum fuss. The versatility of ‘Loading…’ means you can easily adapt it to your taste preferences, making it a go-to dish for any occasion.
For serving suggestions, I love pairing ‘Loading…’ with a fresh, crisp salad to cut through the richness, or alongside some fluffy rice or crusty bread to soak up all those delicious flavors. Don’t be afraid to get creative! You can easily introduce new textures and tastes by adding your favorite vegetables, a sprinkle of exotic spices, or even a dollop of a complementary sauce. I genuinely encourage you to dive in, gather your ingredients, and experience the magic of ‘Loading…’ for yourself. I’m confident it will become a beloved staple in your culinary repertoire.
Frequently Asked Questions:
Can I make ‘Loading…’ ahead of time?
Absolutely! ‘Loading…’ actually benefits from being made ahead. The flavors meld beautifully over time, so preparing it a day in advance will often result in an even more delicious final dish. Simply store it in an airtight container in the refrigerator and reheat gently before serving.
What are some good vegetarian or vegan adaptations?
This recipe is wonderfully adaptable! For a vegetarian version, you can easily substitute the main protein with hearty mushrooms, firm tofu, or a blend of your favorite vegetables. For a vegan option, ensure all dairy components are swapped for plant-based alternatives, such as coconut milk or cashew cream, and omit any animal-derived ingredients.
Loading…
A simple and delicious recipe. Essential steps for tender and succulent chicken.
Ingredients
-
Chicken pieces
-
Salt
-
Black pepper
-
Garlic powder
-
Paprika
-
Olive oil
Instructions
-
Step 1
Start by patting the chicken dry; this helps the seasoning stick better. -
Step 2
Season the chicken generously with salt, pepper, garlic powder, and paprika. -
Step 3
Heat olive oil in a skillet over medium-high heat. -
Step 4
Sear chicken for 5-7 minutes per side until golden brown. -
Step 5
Reduce heat to medium-low, cover, and cook until the chicken reaches an internal temperature of 165°F (74°C). -
Step 6
Use a meat thermometer to check that your chicken reaches 165°F (74°C). This ensures it’s safe to eat, yet still tender. -
Step 7
Let the chicken rest for about 5 minutes after cooking. This lets the juices redistribute, making each bite more succulent.
Important Information
Nutrition Facts (Per Serving)
It is important to consider this information as approximate and not to use it as definitive health advice.
Allergy Information
Please check ingredients for potential allergens and consult a health professional if in doubt.