Easy Homemade Fruit Leather Recipe-Sweet Healthy Snack
Homemade Fruit Leather Recipe: The vibrant, chewy delight that instantly transports me back to carefree summer days! If you’re anything like me, the thought of perfectly sweet, slightly tart fruit leather conjures up happy memories of school lunches and outdoor adventures. What makes this treat so universally loved? It’s the pure, unadulterated flavor of real fruit, concentrated into a satisfyingly chewy strip that’s both a healthy snack and a fun project. Forget the store-bought versions loaded with questionable additives; crafting your own fruit leather is incredibly rewarding. It’s a fantastic way to use up seasonal produce, and the simple process allows you to customize flavors to your heart’s content. Get ready to unleash your inner snack artist with this delightful homemade fruit leather recipe – it’s surprisingly easy and endlessly delicious.
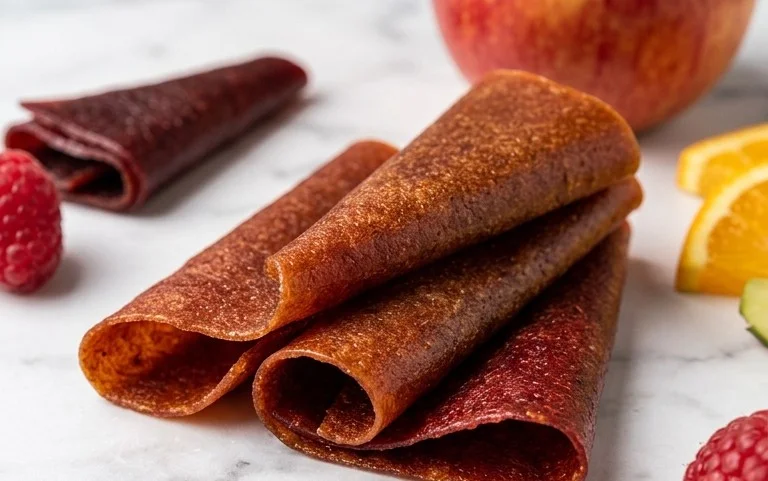
Homemade Fruit Leather Recipe
Making your own fruit leather is a wonderfully rewarding and surprisingly simple process. It’s a fantastic way to preserve the vibrant flavors of seasonal fruits and create a healthy, chewy snack that kids and adults alike will adore. Forget those artificially flavored, overly processed store-bought versions; this homemade recipe celebrates the pure, unadulterated taste of real fruit. Plus, it’s a great activity to do with children, allowing them to get hands-on in the kitchen and feel a sense of accomplishment. We’ll be using just a few simple ingredients to transform fresh fruit into delightful, tangy-sweet strips of goodness.
Ingredients:
Preparing Your Fruit
The beauty of this recipe lies in its versatility. You can use virtually any fruit you love! For this demonstration, let’s imagin extracte we’re using ripe, juicy strawberries. Ensure your fruit is washed thoroughly. If you’re using larger fruits like peaches or apples, you’ll want to peel and core them before chopping. For berries, a quick rinse is usually sufficient. The key is to chop the fruit into relatively small, uniform pieces. This will help it cook down evenly and blend into a smooth puree. If you’re aiming for a super smooth texture, consider removing seeds from fruits like raspberries or peaches, although for many fruits, leaving them in is perfectly fine and adds a rustic charm. We’re looking for a total of about 2 cups of chopped fruit.
Cooking and Pureeing
Now it’s time to transform our chopped fruit into a delectable base for our fruit leather.
1. Simmering the Fruit: Place your chopped fruit in a medium saucepan. Add the 3 tablespoons of white sugar. The sugar not only adds sweetness but also helps with preservation and achieving that classic chewy texture. If your fruit is particularly tart, you might want to increase the sugar slightly, perhaps by another tablespoon, but I recommend starting with the suggested amount and tasting as you go. Add the juice of half a lemon. The lemon juice is crucial; it brightens the fruit’s natural flavor, adds a delightful tang, and acts as a natural preservative, helping to prevent the fruit leather from browning and maintaining its vibrant color.
2. Cook Until Soft: Place the saucepan over medium heat. Stir the fruit and sugar to combine. Bring the mixture to a gentle simmer. Once simmering, reduce the heat to low, cover the saucepan, and let it cook for about 10-15 minutes, stirring occasionally. You want the fruit to soften considerably and release its juices. It should become tender enough to easily mash with a fork. The goal here is to break down the fruit’s structure so it can be easily blended into a smooth consistency. Be mindful of the heat; you don’t want the fruit to burn.
3. Cool and Blend: Once the fruit has softened, remove the saucepan from the heat and let the mixture cool down slightly for about 5-10 minutes. This is important for safety when blending. Carefully transfer the cooked fruit mixture to a blender or a food processor. If you don’t have either, a sturdy immersion blender will also work perfectly. Blend the mixture until it is completely smooth and free of any large chunks. You’re aiming for a consistency similar to applesauce or a very thick smoothie. If the mixture seems too thick to blend easily, you can add a tablespoon of water at a time, but do so sparingly to keep the leather from becoming too thin.
Dehydrating or Baking
This is where the magic happens – transforming our fruit puree into chewy fruit leather! You have two primary methods for this: using a dehydrator or your oven.
4. Prepare for Drying: If you’re using a dehydrator, line the dehydrator trays with parchment paper or silicone dehydrator sheets. If you’re using your oven, preheat it to the lowest possible temperature, typically around 140°F (60°C) to 170°F (77°C). If your oven doesn’t go that low, you can prop the oven door open slightly with a wooden spoon to allow for air circulation and prevent overheating. Line a baking sheet (or two, depending on how much fruit leather you’re making) with parchment paper. Ensure the parchment paper is smooth and wrinkle-free, as this will create a smoother fruit leather.
5. Spread and Dry: Pour your fruit puree onto the prepared surface (dehydrator tray or parchment-lined baking sheet). Using a spatula or the back of a spoon, spread the puree into a thin, even layer. Aim for a thickness of about 1/8 to 1/4 inch. Consistency is key here; thicker areas will take longer to dry than thinner areas, leading to uneven results. If you’re making multiple batches or using a baking sheet, ensure there’s enough space for air to circulate around them in the oven.
Cooling and Storing
Once your fruit leather has reached the desired consistency, it’s time to finish the process.
6. Cooling and Cutting: Carefully remove the fruit leather from the dehydrator or oven. Let it cool completely on the parchment paper. Once cooled, gently peel the fruit leather from the parchment paper. You can cut it into strips, squares, or any fun shapes you desire using kitchen shears or a sharp knife. This is a great time to involve the kids again for the fun cutting part!
7. Storing Your Creation: To store your homemade fruit leather, roll up the strips or squares tightly. You can wrap each individual piece in plastic wrap or parchment paper to prevent them from sticking together. Store the fruit leather in an airtight container at room temperature for up to a week, or in the refrigerator for a longer shelf life, typically up to a month. For even longer storage, you can freeze it for several months. Enjoy your delicious, homemade fruit leather as a healthy snack or a sweet treat!

Conclusion:
Creating your own homemade fruit leather is an incredibly rewarding and surprisingly simple process! This recipe is fantastic because it allows you to harness the natural sweetness of fresh fruits, creating a healthy and delicious snack free from artificial additives and excessive sugar. It’s a wonderful way to preserve seasonal produce and provides a guilt-free treat for kids and adults alike. The flexibility of this homemade fruit leather recipe means you can tailor it to your favorite flavors and dietary needs. I truly encourage you to give it a try – the satisfaction of pulling that perfectly pliable, intensely fruity leather from your oven is immense!
Serving suggestions are endless! Enjoy your fruit leather as a lunchbox treat, a post-workout snack, or even as a creative dessert component. Roll it up into neat spirals or cut it into fun shapes. It pairs beautifully with cheese, yogurt, or even as a topping for ice cream. Don’t be afraid to get creative with variations – think about combining different fruits, adding a sprinkle of cinnamon, or even a hint of gin extractger for an extra kick. Experimentation is key to finding your perfect fruit leather combination!
Frequently Asked Questions:
What fruits work best for homemade fruit leather?
Almost any fruit can be used, but fruits with a good balance of sweetness and natural pectin, like berries (strawberries, raspberries, blueberries), apples, apricots, peaches, and mangoes, tend to yield the best results. For tartness, consider adding a few cranberries or a squeeze of lemon juice.
How long does homemade fruit leather last?
When stored properly, wrapped tightly and kept in an airtight container at room temperature or in the refrigerator, your homemade fruit leather can last for several weeks. For longer storage, you can freeze it for up to a year.
Can I make fruit leather without an oven?
Yes! You can use a dehydrator set to a low temperature (around 135°F or 57°C) until the fruit leather is pliable and no longer sticky. This might take longer than oven baking.
Homemade Fruit Leather
A simple and delicious way to preserve fresh fruit into a sweet and chewy treat.
Ingredients
-
2 cups fruit, chopped
-
3 tbsp white sugar
-
½ whole lemon, just the juice
-
1 cup water
-
1 tsp vanilla extract
-
¼ tsp salt
Instructions
-
Step 1
Prepare your fruit by washing, chopping, and removing any pits or seeds. -
Step 2
Combine the chopped fruit and water in a saucepan. Bring to a simmer over medium heat and cook until the fruit is very soft, about 10-15 minutes. -
Step 3
Remove from heat. Stir in the white sugar, lemon juice, vanilla extract, and salt until the sugar is dissolved. -
Step 4
Puree the mixture using an immersion blender or in a regular blender until smooth. -
Step 5
Line a baking sheet with parchment paper or a silicone baking mat. Pour the fruit puree onto the prepared sheet and spread it evenly to about ¼-inch thickness. -
Step 6
Bake in a preheated oven at 170°F (77°C) for 4-6 hours, or until the fruit leather is no longer sticky to the touch and peels easily from the parchment paper. -
Step 7
Let cool completely, then cut into strips or shapes.
Important Information
Nutrition Facts (Per Serving)
It is important to consider this information as approximate and not to use it as definitive health advice.
Allergy Information
Please check ingredients for potential allergens and consult a health professional if in doubt.