Piped Rainbow Shortbread Cookies-Easy Recipe
Piped rainbow shortbread cookies are more than just a treat; they’re a vibrant celebration in every bite! Imagin extracte the pure joy of biting into a buttery, crum extractbly shortbread, only to discover a spectrum extract of cheerful colors artfully swirled and piped right on top. That’s the magic of these Piped rainbow shortbread cookies, and it’s why they’ve become a runaway hit for bakers of all skill levels. We all love shortbread for its simple elegance and satisfying texture, but these Piped rainbow shortbread cookies take it to a whole new level of visual delight. What truly sets them apart is the stunning, artistic presentation that transforms a classic into a showstopper, making them perfect for birthdays, parties, or just brightening up an ordinary afternoon.
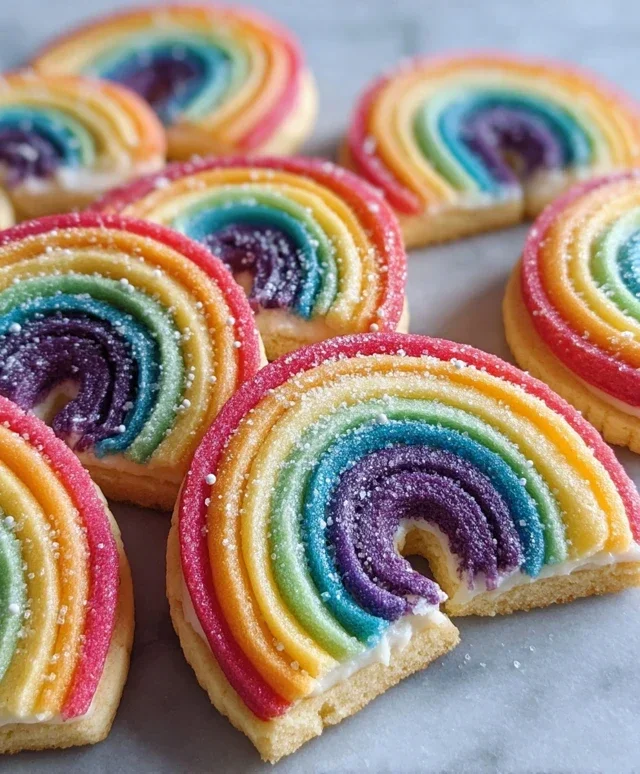
Piped Rainbow Shortbread Cookies
These Piped Rainbow Shortbread Cookies are a delightful way to add a splash of color and a whole lot of sweetness to any occasion. Imagin extracte biting into a perfectly crisp, buttery shortbread base, followed by a vibrant swirl of colorful frosting, all topped with a sprinkle of rainbow magic. They’re surprisingly easy to make and are sure to impress your friends and family. The key to their charm lies in the simple yet elegant piping technique, creating a beautiful rainbow effect that is as fun to look at as it is to eat. Get ready to create a batch of edible sunshine!
Ingredients:
Instructions:
Making the Shortbread Dough
The foundation of these beautiful cookies is a classic, buttery shortbread dough. It’s important to use softened butter, not melted, as this will help create the perfect tender texture. Start by whisking together the dry ingredients in a large bowl: the all-purpose flour, sugar, and salt. This ensures an even distribution of the salt and sugar throughout the dough. Next, add the softened butter pieces to the dry ingredients. You can either use a pastry blender, your fingertips, or a stand mixer with the paddle attachment to cut the butter into the flour mixture. You’re looking for a coarse meal consistency, similar to very fine breadcrum extractbs, with some pea-sized pieces of butter still visible. These little pockets of butter will contribute to the cookie’s delightful crum extractbly texture.
Once you have that coarse meal texture, it’s time to bring the dough together. Add about 2 to 4 tablespoons of ice-cold water, one tablespoon at a time, mixing just until the dough starts to clump together. Be careful not to overmix at this stage, as overworking the dough can lead to tough cookies. The dough should be shaggy but hold together when you squeeze a bit of it in your hand. Turn the dough out onto a lightly floured surface and gently knead it a few times to form a cohesive ball. Don’t knead extensively; just enough to bring it together. Divide the dough into four equal portions, as we will be coloring each portion separately. This is where the fun really begin extracts!
Coloring and Shaping the Dough
Take each portion of the shortbread dough and place it in a separate small bowl. To each bowl, add a few drops of your chosen gel food coloring. Gel food coloring is preferred over liquid because it’s more concentrated and won’t add excess moisture to the dough. Start with a small amount and add more until you achieve your desired vibrant shade. Gently knead the color into each portion of dough until it’s evenly distributed. You’ll want distinct, bright colors for your rainbow effect. Once colored, flatten each portion of dough into a disc, wrap them tightly in plastic wrap, and refrigerate for at least 30 minutes. This chilling period is crucial as it firms up the butter, making the dough easier to handle and preventing the colors from bleeding into each other when you assemble the cookies.
After chilling, take one color of dough at a time and place it on a lightly floured surface. Roll it out into a rectangle approximately 8×6 inches. Aim for a thickness of about ¼ inch. Repeat this process with your remaining three colors of dough. Once all four colors are rolled out into rectangles, you’ll assemble the rainbow. Place one colored rectangle on top of another, gently pressing them together. Then, place the third colored rectangle on top of the second, and finally, the fourth colored rectangle on top of the third. You should now have a layered stack of four colored dough rectangles. This layering is what will create the beautiful rainbow effect when you slice the cookies.
Slicing and Baking the Shortbread
Once your layered dough is assembled, it’s time to prepare it for slicing. Tightly roll up the layered dough rectangle like a jelly roll, starting from one of the longer sides. Ensure the roll is firm and compact; this will help maintain the distinct layers when you slice. Once rolled, wrap the log in plastic wrap and refrigerate for another 30-60 minutes, or until firm enough to slice cleanly. A well-chilled dough will prevent the layers from smushing together during slicing.
Preheat your oven to 350°F (175°C). Line baking sheets with parchment paper. This will prevent the cookies from sticking and make for easy cleanup. Take the chilled dough log and, using a sharp knife, slice it into rounds about ¼ inch thick. If the dough starts to soften too much, pop it back into the refrigerator for a few minutes. Place the sliced cookies onto the prepared baking sheets, leaving about 1 inch of space between them to allow for slight spreading. Bake for 10-14 minutes, or until the edges are lightly golden and the centers are set. The exact baking time will depend on your oven and the thickness of your cookies. Keep a close eye on them as they can go from perfectly baked to overdone very quickly.
Finishing Touches: Glazing and Decorating
While your shortbread cookies are cooling, prepare the white chocolate glaze. In a microwave-safe bowl, melt the white melting wafers according to package directions, usually in 30-second intervals, stirring between each. Be careful not to overheat the melting wafers, as they can seize up and become unusable. Once smooth and melted, you can dip the tops of your cooled cookies into the glaze, or use a spoon to drizzle it artfully. A thin, even coat is usually best to let the rainbow shortbread shine through.
Immediately after dipping or drizzling the white chocolate glaze, sprinkle the tops generously with rainbow nonpareils. The nonpareils will adhere beautifully to the still-wet chocolate. Allow the glaze to set completely on a wire rack. This can take about 30 minutes to an hour, depending on the ambient temperature. Once the glaze is fully hardened, your beautiful Piped Rainbow Shortbread Cookies are ready to be enjoyed or shared. They are perfect for parties, holidays, or just a cheerful afternoon treat!

Conclusion:
I hope you’re as excited as I am to try these Piped Rainbow Shortbread Cookies! This recipe is truly fantastic because it combines the simple, buttery deliciousness of classic shortbread with a vibrant and whimsical visual appeal that’s guaranteed to bring a smile to anyone’s face. The process of piping the rainbow is incredibly satisfying and surprisingly achievable, even for begin extractners. These cookies are perfect for any occasion, from a festive birthday party to a delightful afternoon tea, or even just as a colorful treat to brighten your day. Don’t be afraid to experiment with different color combinations or even add a touch of edible glitter for extra sparkle!
I encourage you all to dive into your kitchens and create these cheerful delights. You’ll find they are not only beautiful but also incredibly satisfying to make and, of course, to devour. They pair wonderfully with a cup of tea or coffee, and their charming appearance makes them an excellent gift for friends and family. Get ready for compliments and requests for the recipe!
Frequently Asked Questions:
Q: My piped rainbow lines aren’t as crisp as in the pictures. What can I do?
A: For sharper lines, ensure your cookie dough is well-chilled before piping. Also, make sure your icing consistency is not too thin; it should be thick enough to hold its shape but still pipeable. Using a small, round piping tip can also help achieve finer, more defined lines.
Q: Can I make these Piped Rainbow Shortbread Cookies ahead of time?
A: Absolutely! Once baked and completely cooled, these cookies can be stored in an airtight container at room temperature for up to a week. They actually tend to be even more delicious after a day or two as the flavors meld together.
Q: I don’t have piping bags. Are there any alternatives for piping the rainbow?
A: Yes! You can use a Ziploc bag with a tiny corner snipped off. For smaller details or if you want to be very precise, you could also use a small spoon to carefully dollop small amounts of icing in your rainbow pattern, though this will create a different, less defined look. Alternatively, you can use toothpick to draw the lines after applying the icing.
Piped Rainbow Shortbread Cookies
Delightful shortbread cookies with vibrant piped rainbow colors and a sweet candy melt coating, topped with rainbow nonpareils.
Ingredients
-
2¼ cups all-purpose flour
-
¾ cup sugar
-
¼ tsp salt
-
1 cup unsalted butter, cut into pieces
-
Gel food coloring (4 colors of your choice)
-
1 cup white melting wafers
-
Rainbow nonpareils (for topping)
Instructions
-
Step 1
In a large bowl, whisk together flour, sugar, and salt. Cut in the butter until the mixture resembles coarse crumbs. -
Step 2
Divide the dough into four equal portions. Tint each portion with a different gel food coloring, kneading until the color is evenly distributed. -
Step 3
Roll each colored dough portion into a log about 1 inch in diameter. Wrap logs in plastic wrap and chill for at least 30 minutes. -
Step 4
Preheat oven to 350°F (175°C). Slice logs into ½-inch thick rounds. Place cookies on a baking sheet lined with parchment paper. -
Step 5
Bake for 10-12 minutes, or until edges are lightly golden. Let cool on the baking sheet for a few minutes before transferring to a wire rack to cool completely. -
Step 6
Melt white melting wafers according to package directions. Dip each cooled cookie into the melted wafers, allowing excess to drip off. -
Step 7
Immediately sprinkle the coated cookies with rainbow nonpareils before the coating sets. Let dry completely.
Important Information
Nutrition Facts (Per Serving)
It is important to consider this information as approximate and not to use it as definitive health advice.
Allergy Information
Please check ingredients for potential allergens and consult a health professional if in doubt.