Mini Cannoli Cups- Delicious Italian Treats
Mini Cannoli Cups are the miniature marvels that have captured my dessert-loving heart, and I’m so excited to share this recipe with you! There’s something undeniably magical about a classic cannoli – that crisp, golden shell giving way to a luxuriously creamy, sweet ricotta filling. But let’s be honest, a full-sized cannoli can sometimes feel a bit… overwhelming. That’s where these delightful Mini Cannoli Cups truly shine. They offer all the authentic, irresistible flavor of their larger counterparts, but in perfectly portioned, bite-sized packages.
Why You’ll Adore Mini Cannoli Cups:
These little beauties are perfect for parties, holidays, or simply when you crave a sweet treat without the commitment. They’re incredibly versatile, allowing for endless topping possibilities. From the traditional dusting of powdered sugar and chocolate chips to more creative flourishes like fresh berries or a drizzle of caramel, these Mini Cannoli Cups can be customized to your heart’s content. Get ready to impress your friends and family with these charming, delicious delights that are surprisingly easy to make!
Mini Cannoli Cups
If you’ve ever dreamed of enjoying the delightful crunch and creamy filling of cannoli without the fuss of rolling and frying dough, then you’re in for a treat! These Mini Cannoli Cups are a game-changer. They capture all the classic flavors of traditional cannoli but are made incredibly simple using readily available refrigerated pie crusts. They’re perfect for parties, a sweet after-dinner indulgence, or whenever that cannoli craving strikes. The beauty of this recipe lies in its ease, allowing you to create individual, charming desserts that are both visually appealing and incredibly delicious. We’ll be transforming simple pie crusts into delicate, golden cups, which then become the perfect vessel for a luscious, sweet ricotta filling.
Ingredients:
Instructions:
Preparing the Ricotta Filling:
Creating the Pie Crust Cups:
Baking and Assembling:
Conclusion:
I hope you’ve enjoyed learning how to make these delightful Mini Cannoli Cups! They truly are a fantastic dessert because they capture all the classic, irresistible flavors and textures of traditional cannoli – that crispy shell, the sweet, creamy ricotta filling, and the hint of citrus – all in a perfectly portioned, bite-sized treat. They’re so much easier to assemble than their larger counterparts, making them ideal for parties, gatherings, or just a special treat for yourself. I love serving them as an elegant finish to an Italian-themed dinner, but they’re equally at home at a baby shower or a birthday celebration. Feel free to get creative with your toppings! Beyond the classic mini chocolate chips, consider chopped pistachios, candied orange peel, or even a dusting of cocoa powder. Don’t be afraid to experiment and make these Mini Cannoli Cups your own. I encourage you to give this recipe a try; I’m confident you’ll be rewarded with delicious results and happy smiles all around.
Frequently Asked Questions:
Can I make the shells ahead of time?
Yes, absolutely! The cannoli shells can be made a day or two in advance and stored in an airtight container at room temperature once they are completely cooled. It’s best to fill them just before serving to maintain their crispness.
What if I can’t find mini chocolate chips?
No problem! You can finely chop a good quality dark or milk chocolate bar as a substitute for mini chocolate chips. You could also use chopped pistachios, finely diced candied fruit, or even a sprinkle of powdered sugar for decoration.
My filling seems a bit runny. What can I do?
To thicken a slightly runny ricotta filling, you can strain the ricotta for a longer period before mixing, or you can gently fold in a tablespoon or two of powdered sugar and let the mixture chill in the refrigerator for at least 30 minutes. This will help it firm up.
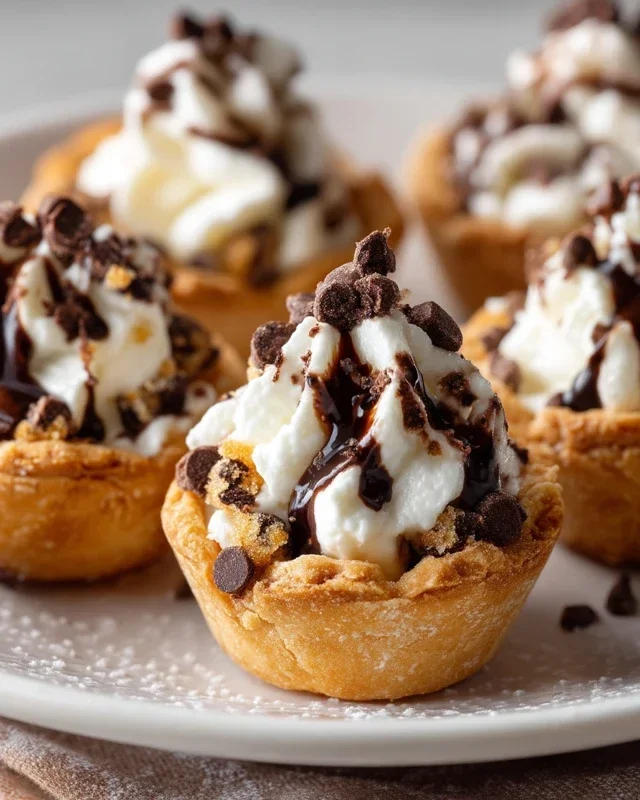
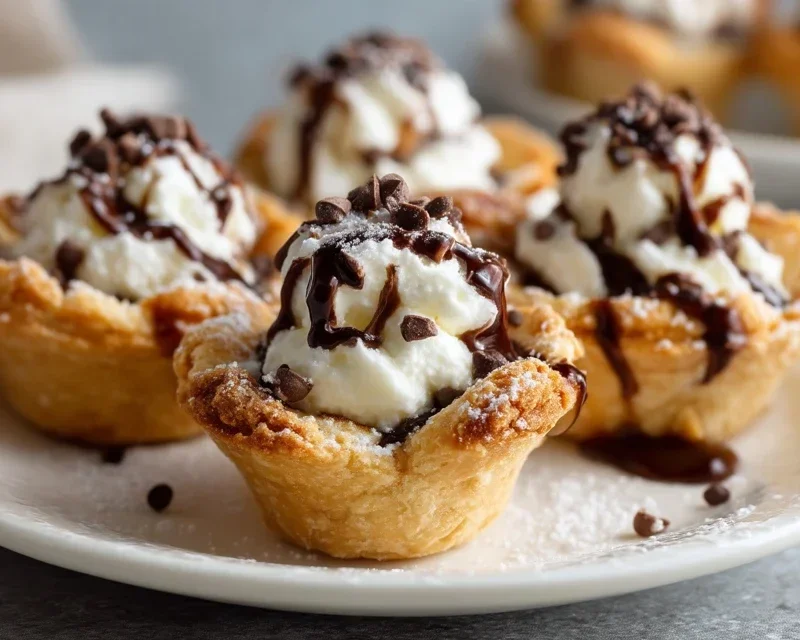
Mini Cannoli Cups
A delightful dessert featuring crisp, baked pie crust cups filled with a sweet, creamy ricotta mixture and finished with a sprinkle of cinnamon sugar and chocolate chips or pistachios.
Ingredients
-
1 container whole-milk ricotta cheese (15 oz., drained)
-
1/2 cup powdered sugar
-
2 tablespoons granulated sugar
-
1 teaspoon finely grated orange or lemon zest
-
1/2 teaspoon vanilla extract
-
1 box refrigerated pie crusts, softened as directed on box (2 count)
-
3 tablespoons turbinado sugar (raw sugar)
-
1 teaspoon ground cinnamon
-
1/4 cup miniature semisweet chocolate chips or finely chopped pistachios
-
additional powdered sugar
Instructions
-
Step 1
Preheat oven to 375°F (190°C). Lightly grease a 12-cup mini muffin tin. -
Step 2
In a medium bowl, combine the drained ricotta cheese, 1/2 cup powdered sugar, 2 tablespoons granulated sugar, orange or lemon zest, and vanilla extract. Stir until well combined and smooth. -
Step 3
Unroll the refrigerated pie crusts. Cut each crust into 4 equal squares. Press each square into the cups of the prepared mini muffin tin, forming a cup shape. -
Step 4
Bake for 12-15 minutes, or until the crusts are golden brown and crisp. -
Step 5
While the crusts are baking, in a small bowl, combine the turbinado sugar and ground cinnamon for the coating. -
Step 6
Once baked, carefully remove the crusts from the muffin tin. Let them cool completely on a wire rack. -
Step 7
Fill each cooled cannoli cup with the ricotta mixture. Sprinkle the tops with the cinnamon sugar mixture. Garnish with miniature chocolate chips or finely chopped pistachios. -
Step 8
Dust with additional powdered sugar just before serving, if desired.
Important Information
Nutrition Facts (Per Serving)
It is important to consider this information as approximate and not to use it as definitive health advice.
Allergy Information
Please check ingredients for potential allergens and consult a health professional if in doubt.